Saturday 30 January 2016

Free patterns and the Victoria and Albert museum


If you go onto the Victoria and Albert museum website and put in free knitting patterns you come up with this.  When you are on their site all you have to do is click on them and download for FREE each knitting instruction pattern of 1940's Knits...... It is as simple as that.

Take a little look at what is available and then go over to their website .. I am afraid their link does not work on this blog (no link will for some reason) anyway have a wonderful weekend and enjoy your browse.

Happy Stitching and of course Knitting!!!


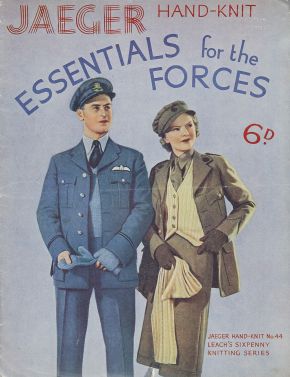
'Essentials for the Forces' (front cover), Jaeger, 1940s
The 1940s in Britain was a high point for hand knitting. Women on the home front could make a contribution to the war effort by knitting for the troops using patterns that were often given away free.

Many specialised patterns developed such as the balaclava helmet with ear flaps for use in telephone operations or the mittens with a separate forefinger for firing a trigger in the cold.
Click on an image to view the pattern. (on their web page .. not working on here I am afraid!!)


Friday 29 January 2016

Scraps of beautiful fabrics and samplers .....


Being creative is a way of life 
to me.  I get up each day with 
my head dancing with designs that have
to be jotted down in my journal.


I know I am not the only one who has a basket of beautiful fabric scraps.  Little pieces of beauty that I can not possible just put in the bin.  I sew them on to all sorts of things and if I want to cut out a little heart for a design, lets say, my scrap basket is my first point of call before I cut into a large piece of paisley.  

On Wednesday it was monumental rain here all day.  The day was dark and I had the lights on around the house with fairy lights all twinkling and candles lit.  Even with light it was hard to see for hand stitching properly so I got my scrap baskets down and cut out lots of tiny hearts ... I like to appliqué
them onto samplers and patches and I thought I would start a jar of them.  I felt that I was still doing something.  It was only 3pm in the afternoon but outside it was like 7pm at night, the sky was black and the rain was coming down in rods.  The New Forest near to where we live had flooded and trains were stopped and my husband had a devil of a job getting home.  So I sat happily cutting tiny hearts out of bits of beautiful fabrics and reminiscing about the bigger bits of these stunning fabrics that I had once but are now happily made into something else for others to enjoy.

It becomes very quite addictive and calming.  I then started sorting bits for patches and to stitch on to samplers and other goodies.  Little squares that are too lovely in their own right to cut up again put would make a great addition to a piece of work on there own ... if you put them together they look lovely.  So I had a bit of a sort out of my basket of vintage fabric scraps but also it has enabled me to just go to my jars for squares or hearts.  I still have a basket of fabrics that have not been categorised but now I have three places to look for a tiny bit of fabric that will be just right for the job in hand!

Then me being me and not liking waste I had a few strips of linen that I guess some would throw
away.  One bit had like threads hanging which look fabulous and one bit was a hem from a vintage linen sheet.  I thought I could make little bundles of fabrics and tie them up with those.  Hoarder or being careful and non wasteful .... that is to be decided I guess.

Anyway I had a great time sorting as it was to dark to hand stitch tiny stitches and I wanted them very neat and hate unpicking .. not just because I feel it is not good for the vintage fabrics but I really do not like doing it, my humour goes!

Well today is a little better it seems so I hope to get some stitching done.  Plus good new my sewing machine is back so I can do some machining as well.  Have a great weekend and do not forget there is a blog tomorrow being Saturday..... This is a great one if you love vintage and like to knit.

Happy Stitching!


Thursday 28 January 2016

Pom Pom Making .. with great results!


So much fun you can not stop .. warning it is 
addictive!


As you all know last year (gosh that sounds like ages ago but it is not!) I bought a great multi pom pom maker when I was out and about and I showed you on here a picture of it.

Since then I have had some great feed back from some of you who bought one too.  I was yet to try it out properly and so I had a little go.

I have a great idea for some pom poms and what I can do with them so I thought it about time I at least started on this project by making the pom poms up front and then I can choose my fabrics and bits from there.  I have to warn you all it is addictive in every sense of
the word.  I could keep making them all day because is not stressful and it is simple but extremely effective.

So it is a pink metal frame as you saw in my earlier blog  ( picture above) and you wind your wool around and cut bits of wool to tie in between to form the middle of each ball and then you cut at equal intervals as you can see from the photo on the right.

So then when you have cut them you just fluff them up in your hands and the ones on each end of frame need a slight trim with
your scissors to make all the wool neat and tidy as the ones at the very end of each side of the frame have a little more wool to help them stay attached to the frame to begin with.

You just roll them around in your hand and fluff them and you have some great looking pom poms ...

I then went on to make five more in another colour to go into my box for my project.  You can make larger ones or up to 20 at a time in the smaller ones ... This is not just a gadget it is A MUST of pom pom making and takes very little time.  Gone are the days of two pieces of cards cut out like doughnuts and the winding, winding of wool through the whole in the middle .....

I am thinking of just doing some every evening and having a pom pom box !

Anyway I must away to my current stitching so I leave you with another picture of what the packet looks like for those of you who did not read the first blog or who thought it was something that perhaps would not work that well ....

Have a great day and as always Happy Stitching!


Wednesday 27 January 2016

Drum Role .... The winner of the competition is announced...


....... Vintage Jane!  you have won the book The Magpie and the Wardrobe Please message me so that I can have your address to send it to you.

Thank you to those of you who entered and there will be another great competition in a few weeks time so keep an eye out for it.

Congratulations to Vintage Jane xx  ...

Tuesday 26 January 2016

The 'Stitch in time exhibit' at the Victoria and Albert Museum.


I simply adore this place, you can basically wander
around here for free and take in the quiet and 
culture of this magnificent museum in the heart
of our wonderful capital and in the heart of fashionable Kensington.


Well as you all know I went to London last Friday and I was there for a few reasons, one being the 'stitch in time exhibit'.  Now I have to say I thought it would be a large exhibit but in fact it is only one glass case.  Now do not get me wrong there are some lovely sewing bits inside said case and some great information, which I will share with you .... But I was a little disappointed that there was not more in the way of stitchery bits.

The V&A has so much to see though that you can still immerse yourself in there for hours at a time and they had some great exhibitions on the go.  One being fashion and the other was shoes!  The shoes exhibit you had to pay for and I would have but no photography was allowed so I could not share it with you all ... thus I decided not to go in.

The Victoria and Albert museum was opened in 1899 and is such a beautiful building in its own right with the original floors and tiles in the toilets and stain glass windows lovingly cared for and that are original.  It is such a pleasure to walk through those iconic doors. 

The Rotunda Chandelier that hangs there is not only for light but a visual delight.  It is a glass sculpture by Dale Chihuly and hangs under the glass rotunda in the entrance of the V & A.  It was installed in 1999 and then substantially altered and enlarged to its current size in 2001.

If you are reading this from abroad and have never been to London and to the Victoria and Albert museum, then please if you ever get the chance to go and see it you will be thrilled I can promise you that.

Well I went off to find the exhibit of stitching bits from the 1900's and there it was.  I have taken a photo of everything in the case for you and written down all the information for you as well.

The first piece in the glass case was a work holder which is made from cut steel and velvet and dated around C1800 -20.  This was used before the invention of the sewing machine to keep fabric taut and straight.  It was to ensure that any cutting or stitching  remained neat and even.  This holder was
designed to hold fabric to the edge of a table.  On the top is a pin cushion and a hook, which was possibly for holding spare thread.  The second piece is again a work holder (bottom left of picture) of cut steel and velvet and dated around C1807 -20.  Cut steel tools where costly and high status possessions.  Some were decorated with faceted studs to catch the light like gemstones and were durable as well as attractive.  George Palmer was the  maker of this particular holder and also made razors and he was a cutler.  He also made penknives and scissors.  On the top right of photo is a cotton winder of cut steel and is believed to be around C1800 -20 in age.

Sewing then was not only a private craft but also a social one and like the work holders this would also have been an expensive and stylish, which would have no doubt been displayed by the person sewing very proudly when working in front of family or friends.  It was designed for easy winding of cottons on to the rotating bobbin which is attached to the clamp that holds it securely to a table.     Then there were a few thimbles and the V & A stated that decorated thimbles had been produced since at least the 1500's, which astounded me.  They were often given to women as sentimental gifts as they symbolised female industriousness and virtue!!

There were these beautiful knitting needles and case of blued steel, silk, chamois and silver-gilt
C1840 -50.  These particular needles were designed for knitting delicate lace, and were stored safely in the embroidered case.  The blue effect on the needles was produced by heating the steel at high temperatures and allowed the knitter to mark the length of of her row of stitches.  The elaborate case suggests that these needles were a prized possession and were taken very good care of.

There were a beautiful pair of scissors (top right of picture) of cut steel and they have initials of A.M C1700 and were probably Abner Morton a scissor maker of the time.  The beautiful scissor were both decorative and functional and were used for fabric cutting.  When the scroll work handle is closed to birds appear as their beaks meet.  The blades resemble obelisk supported by two dogs standing either side of an urn.  This design takes many of its elements from heraldry.  Along side these were these shears with a case C1600.  Shears were also made to cut through fabric.  They are both gilded and inlaid with mother of pearl.  They would have been part of a brides trousseau or collection of household goods, gathered in preparation of a marriage.  Such expensive and attractive shears would have symbolised the high status of the bride and her family.  Then there was a tray of these beautiful buttons made of cut steel C1840 -50.  At this time is was seen that an accomplished seamstress to have the ability to embellish clothes to reflect modern fashions and showed of her skills as a needle woman.  This could be achieved by adding or changing the trimmings.

This very beautiful sewing kit of velvet, steel, bone and mother of pearl is C1890.  This portable
sewing kit  demonstrates how sewing tools could follow the fashion of the day.  Produced at the height of Art Nouveau period, both the heart shape and bright green colour were popular characteristics of this style.  The shape of this sewing kit suggests sentimental and romantic associations and was possibly a gift from a loved one.

Look at the bone handled tools in the case.  This would have been a very expensive gift in its day.

The next piece is a sewing manual of paper and with textile inserts 1838.  The National Society for Promoting the Education of the Poor published this manual in 1838 y to instruct charity schoolgirls in basic needlework and knitting skills.  The book would have been used been used by a teacher, rather than the pupils themselves.  Poor women and girls were expected to support themselves through sewing, often for very long hours and very poor wages.


Then in the very middle of this glass case was this Sewing Machine made in London and is of Cast Iron and Laquer C1875 - 80 and made by E. Ward.  This is one of the first patented sewing machines. It has an elevated shelf to support the fabric.  Such machines were marketed as essential and easy to use accessories for the organised housewife.  An expensive machine like this would have taken pride of place in a middle class drawing room.  It is decorated with a fashionable technique of its time called 'Japanning' -  a type of painted lacquer .....


These stitchery items were beautiful under the lights and proudly put in a glass case.  It was a little tricky to take photos but I hope that I managed fairly well for you all to look at.

Then it was time to go to the cafe and get a lovely cup of coffee and a scone ( well it had to be done!)  The ceilings and windows along with the decoration in there was so beautiful I had to show you a little bit of it...

They have these massive balls of twinkling lights on this very impressive ceiling and the stain glass windows are stunning.

One of the things I learnt about the restaurant and cafe is that originally it had different first and second class menus, and a third class service for 'mechanics and all workmen employed at the Museum Buildings and even for the humble working class visitors'. in its day.. so my guess was I was sitting in the first class section!!!

They have a great gift and book shop inside the V & A and I wandered happily around for several hours.

I hope that you have enjoyed this little tour and tomorrow although I do not do a blog I will be announcing the winner of the competition so please come back and see if it is you, if you took part.

Have a great day and as always Happy Stitching!


Monday 25 January 2016

Vintage French linens, herbal teas and hand dyed threads!


Ideas ... they do not always come in a flash but by diligent trial and error. 
 Experiments take time and thought and an awful lot of fun!


My design that I have been playing with needed something, I needed to make a border and all of the fabrics ( and lets face it I am not short of a few to experiment with) were just not quiet right somehow.  I wanted a border of linen but then it would just be the same colour that I have been stitching on.  Then I thought I know I will dye some to border it.

Here is where the experiment came to me.  I was trying to think about it and so I made myself one of my herbal teas and sat sipping and ... why not?  So I made a few of my herbal teas in bowls and started to dye little bits of vintage linen in each one to test the colours.  The thing is as I have said before I only like natural dyeing and what could be easier and more natural than a fruit tea!  There are no chemicals in it and voilá .....

As a regular reader you will know that I did some detailed blogs over a year ago on natural hand
dyeing and all the plants and fruit that you can use.  This time of year soft fruits are very expensive and so herbal teas are perfect and cheaper.  Just boil a kettle and pop a bag into a bowl, pour over the water and stir it about for a couple of seconds.  Then try a bit of fabric in there to see what colour it becomes.  You can keep putting the tea bag back in if you feel you need a darker colour, you can add but not so easy to take away.  You can tip some away and just add more water if it is too dark.

To say that I am pleased with the results is an understatement and I have been matching up threads with coloured linen and it has opened up a whole new world of dyeing for me....  All because I love drinking herbal teas in the day, let me tell you the kitchens smelt beautiful..... Cinnamon tea, Black currant and Vanilla tea, Apple and Spice, Lemon and Ginger and Echinacea and Raspberry! ... All wonderful side effects of my experiment.

So after putting different herbal tea bags in water and letting the colour get to where I thought it
might be right for the job I then soaked four small pieces of vintage linen in the different teas.  The results where fabulous.  I have shown you here the four pieces plus a fifth piece at the bottom with no tea dye at all so you can see the differences that I have achieved....

The top left piece I put in a apple and spice.  The top right in the Blackcurrant and vanilla.  The second row on the left was cinnamon tea and the last one on the second row on the right was ginger tea .... very similar to the cinnamon but there is a difference that I just could not capture for you with the photo..... The days are so dull here and it is grey light I am afraid.  When I tried with the light on it really was not good at all.

You can see though what can be achieved and I am going to dye a batch in the cinnamon for my border and I think it will work really well.

Why not give it a go yourself and believe me the kitchen smells wonderful!

Happy Stitching!